How to create and build an application
Complete the steps listed on this page to create and build an nRF Connect SDK application or sample in Visual Studio Code. Make sure you have configured the application or sample according to your needs, as described on its documentation page.
How to create an application
The following procedure creates a freestanding application. The steps correspond to the ones listed on the Create an application page in the nRF Connect SDK documentation.
Complete the following steps:
- Open the nRF Connect for VS Code extension by clicking its icon.
-
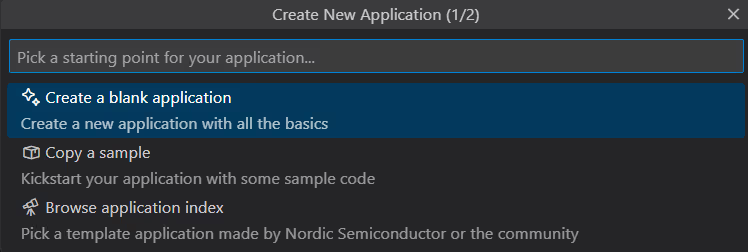
From the Welcome View, click Create a new application. A quick pick menu appears.

-
Choose one of the following options:
- Create a blank application - This will create an application with a code structure that you need to populate from scratch.
- Copy a sample - This will create an application from a sample or an application in the nRF Connect SDK.
- Browse application index - This will create an application from an out-of-tree nRF Connect SDK reference application that follows its own versioning scheme and uses custom west workspace settings. The available reference applications are listed in the online application index.
-
Enter the location for the application. You can also use the folder button at the top of the quick pick to open a folder picker. A folder with the same name cannot already exist in the chosen location. The application creation process starts after you enter the name. When the application is created, a prompt appears asking you what to do with the application.

-
Click one of the following options:
- Open - This opens the new application in your current VS Code window.
- Open in New Window - This opens the new application in a new VS Code window.
- Add to Workspace - Use this option when you have already one or more applications listed in the Applications View. This option opens the new application in your current VS Code window and adds it to your VS Code workspace.
Tip
You can use the
nrf-connect.defaultOpenActionsetting to configure the default action to use when {{ VCS }} prompts you about opening an application.
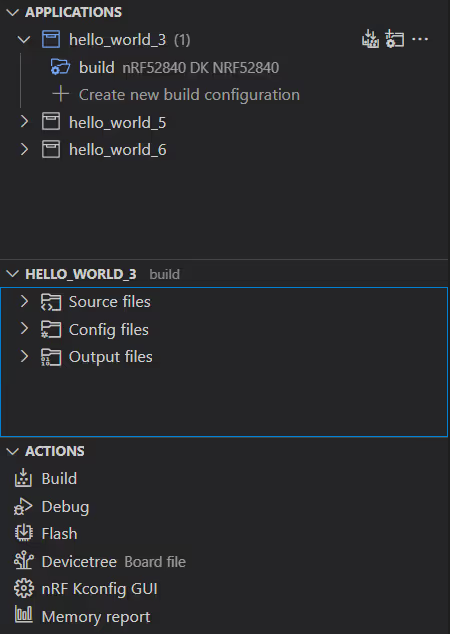
The application is now created and listed in the Applications View.
How to build an application
Complete the following steps:
- Verify the configuration of the sample or application you are planning to build based on the information in the Configuration section in the application or sample documentation in the nRF Connect SDK. This section might contain information about application-specific Kconfig fragments or CMake build fragments.
-
In the Applications View, click on Add build configuration.

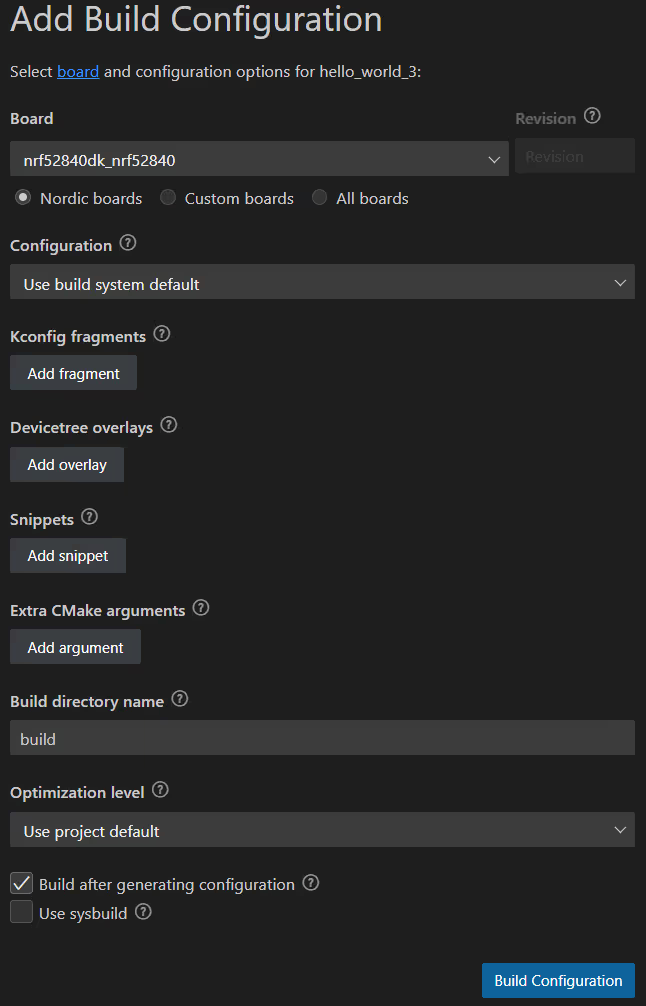
This opens the Add Build Configuration page.

-
Select the board onto which you want to program the sample. The supported boards are also listed in the application or sample documentation in the nRF Connect SDK, in the Requirements section of each application or sample documentation page.
- Optionally, specify the board revision. The build system will match the revision to the best available board revision configuration files.
- Add any desired snippets, Kconfig fragments, devicetree overlays, and extra CMake arguments.
- In Optimization level, select Use project default. This lets you build the application with the basic configuration. You can change this option later.
- Make sure the
Build after generating configurationcheckbox is selected. - Click the Build Configuration button. This generates the configuration file and triggers the build process, which can take some time. You can monitor its progress in the notification that appears.
When the process is complete, the Actions View appears. In this View, you can trigger the build process again, flash the built sample, start a debug session, or generate a memory report. The build files appear in the build's Details View, which is named after your application.

Testing and debugging the application
To test or debug the application or sample you have just built, see the How to flash, test, and debug page.
How to edit a build configuration
You can make changes to the configurations for any application you have already built.
- In the Applications View, click on the build folder that contains the files you want to edit.
- Click on the menu icon that is to the right, or right-click on the build folder.
- Click on Edit Build Configuration.
- After you have edited the configuration, click on Build Configuration to save your changes and rebuild the application with the new configuration.