Hello Sidewalk
This sample demonstrates a simple Sidewalk end node application.
It can send the hello message to Sidewalk cloud on button press, as well as represent the Sidewalk status through LEDs.
Configuration options
The Hello Sidewalk application variant uses the OVERLAY_CONFIG="overlay-hello.conf" configuration, which is applied by default.
The sample variant supports the following Kconfig options:
CONFIG_SIDEWALK– Enables support for the Sidewalk protocol and its dependencies.CONFIG_SIDEWALK_SUBGHZ_SUPPORT– Enables using Sidewalk libraries with Bluetooth LE, LoRa and FSK support. Disabling this option results in using Sidewalk libraries with only Bluetooth LE support. While this results in a smaller memory footprint for the application, it also limits its functionality, as connectivity over LoRa or FSK is not available.CONFIG_SIDEWALK_DFU– Enables the nRF Connect SDK bootloader and DFU service over Bluetooth LE.CONFIG_SID_END_DEVICE– Switches between the application variants.CONFIG_SID_END_DEVICE_HELLO– Enables the Hello Sidewalk application. This is the default option. For more details, see the Hello Sidewalk page.CONFIG_SID_END_DEVICE_SENSOR_MONITORING– Enables the Sidewalk Sensor monitoring application. For more details, see the Sensor monitoring page.CONFIG_SID_END_DEVICE_DUT– Enables the Sidewalk device under test application. For more details, see the Device Under Test (DUT) page.
CONFIG_SID_END_DEVICE_CLI– Enables Sidewalk CLI. To see the list of available commands, flash the sample and typesid help.CONFIG_SIDEWALK_ON_DEV_CERT– Enables the on-device certification Shell.CONFIG_SID_END_DEVICE_AUTO_START– Enables an automatic Sidewalk initialization and start.CONFIG_SID_END_DEVICE_AUTO_CONN_REQ– Enables an automatic connection request before sending a message. If needed, the Bluetooth LE connection request is sent automatically.SID_END_DEVICE_PERSISTENT_LINK_MASK- Enables persistent link mask.CONFIG_SID_END_DEVICE_ECHO_MSGS– The sample echoes the received Sidewalk messages (GETandSETtype) to the Sidewalk cloud.
User Interface
- Button 1 (long press):
Enter DFU state - This action disables the Sidewalk stack and starts the Bluetooth LE SMP Server. You can update the firmware image using the nRF Connect for mobile application. To exit the DFU state, long press Button 1.
- Button 2 (long press):
Factory reset - The application informs the Sidewalk stack about the factory reset event. The Sidewalk library clears its configuration from the non-volatile storage. After a successful reset, the device needs to be registered with the cloud services again.
- Button 3 (long press):
Toggles the Sidewalk link mask - This action switches from Bluetooth LE to FSK, from FSK to LoRa, and from LoRa to Bluetooth LE. A log message informs about the link mask switch and the status of the operation.
- Button 1 (short press):
Send Hello - This action queues a message to the cloud. If Sidewalk is not ready, it displays an error without sending the message. On Bluetooth LE, the application performs Connection Requests before sending the message.
- Button 2 (short press):
Set Connection Request - The device requests the Sidewalk Gateway to initiate a connection while the device advertises through Bluetooth LE. Gateways may not process this request, as it depends on the number of devices connected to it.
- Button 3 (short press):
Toggles the Sidewalk link mask - This action switches from Bluetooth LE to FSK, from FSK to LoRa, and from LoRa to Bluetooth LE. A log message informs about the link mask switch and the status of the operation.
- LED 1:
Indicates that the application established a link and connected successfully. The application is ready to send and receive Sidewalk messages.
- LED 2:
Indicates that the application time synced successfully.
- LED 3:
Indicates that the application registered successfully.
- LED 4:
Indicates that the application woke up successfully.
Building and running
This sample can be found under samples/sid_end_device.
Note
Before you flash your Sidewalk sample, make sure you have completed the following:
You downloaded the Sidewalk repository and updated west according to the Downloading the Sidewalk repository section.
You provisioned your device during the Setting up your Sidewalk product.
This step needs to be completed only once. You do not have to repeat it for every sample rebuild.
To build the sample, follow the steps in the Building and programming an application documentation.
Testing
See Testing and debugging an application for information on testing and debugging in the nRF Connect SDK.
After successfully building the sample and flashing manufacturing data, the sample is ready to use. To refresh the logs, restart the program by pressing the RESET button on your development kit.
Note
If you have multiple Echo devices registered under a single Amazon account, only one of those devices will be able to operate as an FSK gateway even if other devices have the same capability. If you need to operate multiple FSK gateways, we recommend setting them up under separate Amazon accounts.
Starting Sidewalk
To start Sidewalk, do the following:
Connect your Nordic device to the PC through USB. Set the device’s power switch to ON.
Flash the sample application with the manufacturing data as described in the building and running section of the respective sample.
You should see the following logs:
*** Booting nRF Connect SDK 883c3709f9c8 ***
----------------------------------------------------------------
sidewalk             v2.5.0-3-g1232aabb
nrf                  v2.5.0-g271e80422
zephyr               883c3709f9
----------------------------------------------------------------
sidewalk_fork_point = af5d608303eb03465f35e369ef22ad6c02564ac6
build time          = 2023-03-14 15:00:00.000000+00:00
board               = nrf52840dk_nrf52840
----------------------------------------------------------------
[00:00:00.001,373] <inf> application_state: working = true
[00:00:00.055,480] <inf> sidewalk_app: Sidewalk link switch to BLE
When Sidewalk sample starts, LED 4 turns on.
Wait for the device to complete the registration.
You should see the following logs:
[00:00:31.045,471] <inf> sid_thread: Device Is registered, Time Sync Fail, Link status UpWhen Sidewalk registration status changes, LED 3 turns on.
Wait for the device to complete time sync with the Sidewalk network.
You should see the following logs:
[00:00:35.827,789] <inf> sid_thread: status changed: ready
[00:00:35.827,850] <inf> sid_thread: Device Is registered, Time Sync Success, Link status Up
When Sidewalk gets Time Sync, LED 2 turns on.
Wait for the status change.
For a Bluetooth LE device, status change occurs on request. Gateway connects over Bluetooth LE before sending down-link message, and device sends connection request before up-link message. Sidewalk automatically disconnects Bluetooth LE after some inactivity period.
For a LoRa and FSK device, the following messages appear in the log:
[00:45:31.597,564] <inf> sid_thread: status changed: init
[00:45:31.597,564] <dbg> sid_thread: on_sidewalk_status_changed: Device Is registered, Time Sync Success, Link status Up
When Sidewalk Link Status is Up, LED 1 turns on.
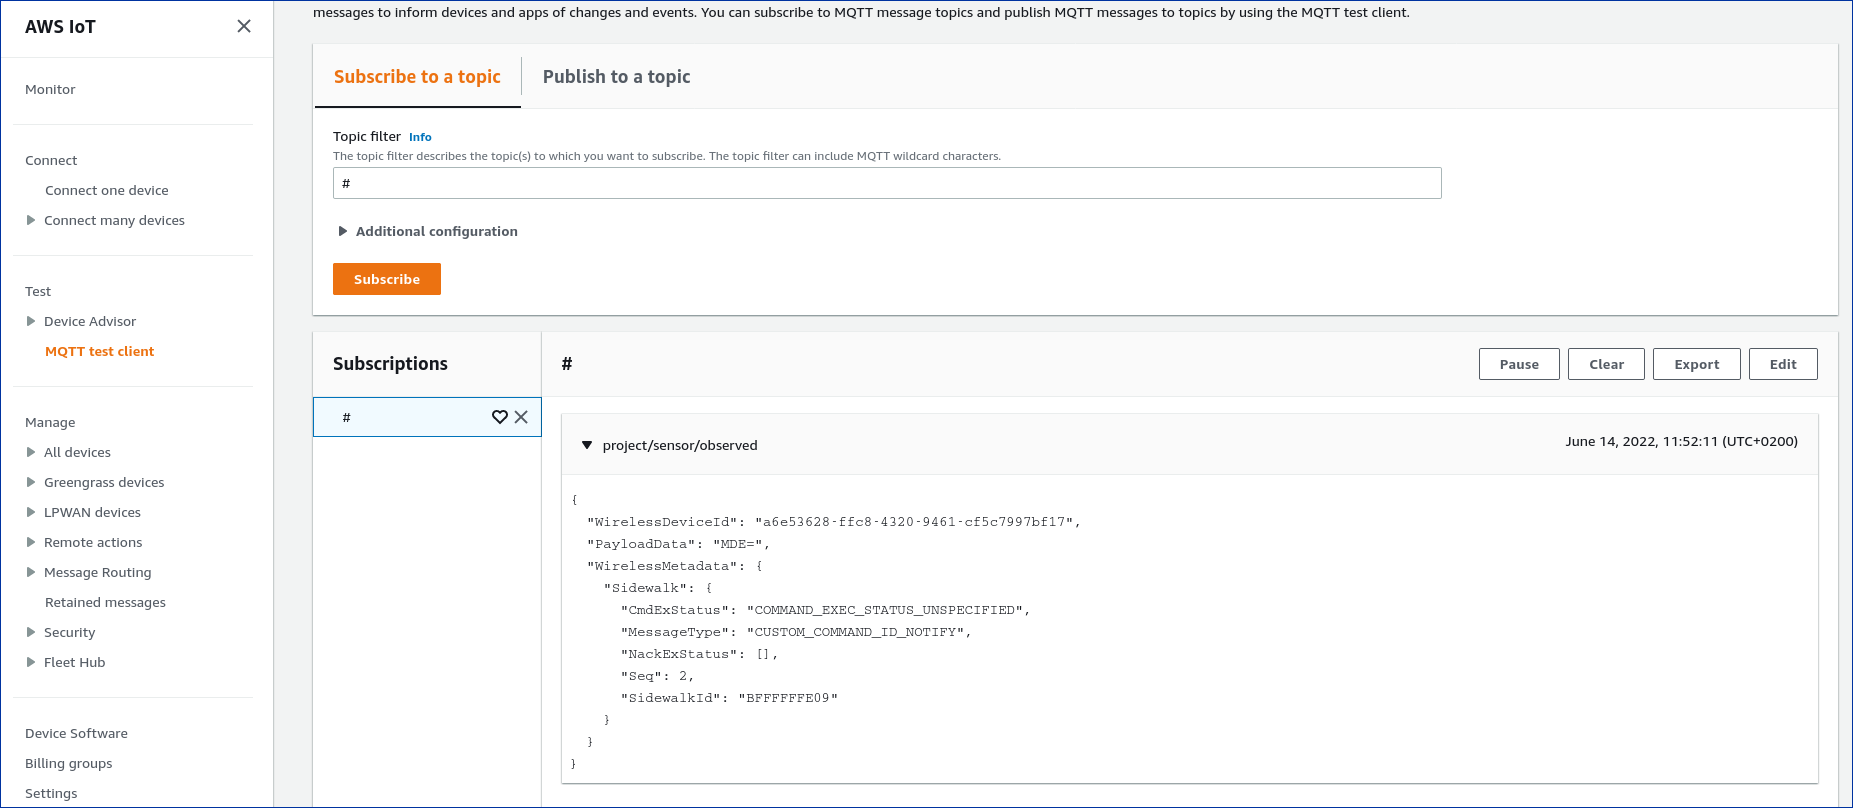
Sending message to AWS MQTT
You can use AWS IoT MQTT client to view the received and republished messages from the device.
Enter
#and click Subscribe to topic. You are now subscribed to the republished device messages.To see the data republished into the subscribed MQTT topic, press Button 1 on your development kit.
# Logs from DK after pressing "Button 1"
[00:04:57.461,029] <inf> sid_end device: Pressed button 1
[00:04:57.461,120] <inf> sid_thread: sending counter update: 0
[00:04:57.461,456] <inf> sid_thread: queued data message id:3


# Logs from MQTT test client
    {
"MessageId": "4c5dadb3-2762-40fa-9763-8a432c023eb5",
"WirelessDeviceId": "5153dd3a-c78f-4e9e-9d8c-3d84fabb8911",
"PayloadData": "MDA=",
"WirelessMetadata": {
   "Sidewalk": {
      "CmdExStatus": "COMMAND_EXEC_STATUS_UNSPECIFIED",
      "MessageType": "CUSTOM_COMMAND_ID_NOTIFY",
      "NackExStatus": [],
      "Seq": 2,
      "SidewalkId": "BFFFFFFFFF"
   }
}
Payload data is presented in base64 format. You can decode it using Python:
python -c "import sys,base64;print(base64.b64decode(sys.argv[1].encode('utf-8')).decode('utf-8'))" MDA=
00
Data is republished into the subscribed MQTT topic.
Receiving message from AWS MQTT
To be able to use AWS CLI, ensure you completed steps in the Installing or updating the latest version of the AWS CLI documentation.
Run the following command to send a message to your Sidewalk Endpoint:
aws iotwireless send-data-to-wireless-device --id=<wireless-device-id> --transmit-mode 0 --payload-data="<payload-data>" --wireless-metadata "Sidewalk={Seq=<sequence-number>}"<wireless-device-id>is the Wireless Device ID of your Sidewalk Device.You can find it in the
WirelessDevice.jsonfile, generated with theNordic_MFG.hexfile during Setting up your Sidewalk product. If you have sent a message before, you can also find your Wireless Device ID in the messages sent from your device to AWS.<payload-data>is base64 encoded.To prepare a message payload in the base64 format, run:
python -c "import sys,base64;print(base64.b64encode(sys.argv[1].encode('utf-8')).decode('utf-8'))" "Hello   Sidewalk!"
SGVsbG8gICBTaWRld2FsayE=
<sequence-number>is an integer and should be different for each subsequent request.Note
Ensure to increase ‘Seq’ number on every message. The device will not receive a message with lower or equal sequence number.
Once you have populated the command with data, it should look similar to the following:
aws iotwireless send-data-to-wireless-device --id=5153dd3a-c78f-4e9e-9d8c-3d84fabb8911 --transmit-mode 0 --payload-data="SGVsbG8gICBTaWRld2FsayE=" --wireless-metadata "Sidewalk={Seq=1}"Successfully sent response should look as follows:
{
    "MessageId": "eabea2c7-a818-4680-8421-7a5fa322460e"
}
Ensure your IAM user or role has permissions to send data to your wireless device in case you see the following error:
{
   "Message": "User: arn:aws:iam::[AWS Account ID]:user/console_user is not authorized to perform:
   iotwireless:SendDataToWirelessDevice on resource: arn:aws:iotwireless:us-east-1:[AWS Account ID]:
   WirelessDevice/[Wireless Device ID]"
}
Data will be received in Sidewalk logs:
[00:06:56.338,134] <inf> sid_thread: Message data:
                              48 65 6c 6c 6f 20 20 20  53 69 64 65 77 61 6c 6b |Hello    Sidewalk
                              21                                               |!
Testing Device Firmware Update (DFU)
To enter the DFU mode, long press Button 1 on your development kit. This action sets the device in the DFU mode, in which only the Zephyr SMP Server is running and Sidewalk is not operational. When the application is in the DFU mode, all LEDs flash every 500 ms to signal that the application is waiting for a new image.
To perform a firmware update, follow the Bluetooth testing steps from the DevZone DFU guide. When the update starts, the LEDs change the pattern to indicate upload in progress.
To exit the DFU mode, long press Button 1 again when device is in DFU mode. The device will set the device in the Sidewalk mode. If the update completes successfully, the device will start a new image. After using the DFU mode, the first bootup might take up to 60 seconds. During the image swap the application is silent, meaning that LEDs are not blinking and the console does not output any logs. The application, however, is running, so do not reset the device. In case the update fails, the old image is started instead.