How to work with boards and devices
The extension provides a variety of GUI options to interact with connected boards and devices. These options cover all required actions, from adding a new device, linking boards to a build configuration, to flashing.
How to choose a board
You set the board for your application when you create or edit a build configuration.

Boards can have different revisions, which can sometimes be found printed on the physical board.
The list of available boards is automatically populated by the extension.
How to add a new board
If you have a custom board, complete the following steps to add it to the list of the boards:
- Click Create a new board from the Welcome View. The Create New Board wizard opens.
- Enter a human-readable name for the board.
- Enter a machine-readable board ID that includes letters, numbers,
-, or_. - Set board root directory.
- Enter the name of the company that made the board.
The board files are added to the board root folder path you provided.
After the board is created, you can select it from the Add Build Configuration screen when you build an application.
The extension finds the new board entries using the nrf-connect.boardRoots configuration setting.
How to link boards
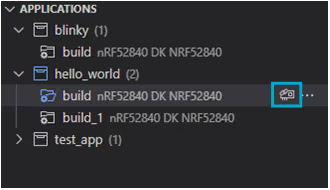
To link a connected board to a build configuration, click on the button next to your selected build configuration. Once the device is linked, the icon of the button changes to indicate the link.

Performing actions such as Flash on a build configuration with a linked device will always perform the action on that linked device.
How to connect to a device
The nRF Connect extension pack includes an integrated serial port and RTT terminal, which allows you to connect and flash a board using either method.
Tip
If you lose your serial connection, for example when your device loses power, it will be automatically restored when the cause of the interruption is solved, as long as you do not close the connection window. This functionality is not available for the RTT terminal, which has to be reconnected manually.
How to connect using serial port
To connect to a device using a serial connection:
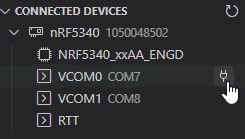
- Plug the device into the same machine you are using to run the extension. The device appears as an entry in the Connected Device View.
- Expand the device entry.
-
Click the Connect to Serial Port button to the right of the serial port entry to start a serial connection.

You will be prompted for configuration settings for the given connection type.
-
Select one of the following options for the connection from the Command Palette:
- Default
115200 8n1preset configuration values - Custom Other configuration values
Note
Only customize the connection values if you have changed the default UART driver settings, to make sure both sets of values are matching.
- Default
-
Optionally, if you chose Other in the previous step, select the custom baud rate, data bits, and stop bits for the connection.
After the connection is established, a new terminal entry is added in the Panel View, with its name corresponding to the name of your device if you renamed the device.
Tip
The extension saves the serial port connection settings for future use. Next time you connect, you can select the previous connection settings from the quick pick menu or change them using the Change port settings button.

How to connect using RTT
Selecting this option frees a UART port that the serial port would use. However, you always need a SEGGER J-Link debugger connected for RTT to work.
To connect to a device using RTT:
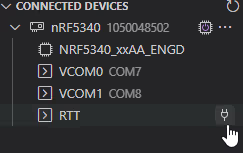
- Plug the device into the same machine you are using to run the extension. The device appears as an entry in the Connected Device View.
- Expand the device entry.
-
Click the Connect to RTT button to the right of the RTT entry to start an RTT connection.

You will be prompted for configuration settings for the given connection type.
-
If you are using a multi-core device, select the core to connect to.
- Select the device to connect to.
-
Select one of the following memory address strategies:
- Search for RTT memory address automatically - This option scans the device memory for the control block.
- Choose from predefined options - This option scans the build configuration for predefined memory address. (This option is not available when you connect using the nRF RTT Terminal launch profile.)
- Specify RTT memory address - This option lets you type in the memory address.
After the connection is established, a new terminal entry is added in the Panel View, with its name corresponding to the name of your device if you renamed the device.
Tip
The extension saves the RTT connection settings for future use for each device. Next time you connect, you can select the previous connection settings from the quick pick menu or change them using the Change port settings button.

How to provide predefined arguments for connection command
You can predefine the arguments for the nrf-terminal.startTerminal command to save time and avoid providing these arguments every time. This sort of customization can be used with the serial port and the RTT connection actions and requires installing and using a third-party extension for Visual Studio Code, for example Commands.
To see the list of arguments for which you can provide values, see the [nrf-terminal.startTerminal] reference section.
The steps to predefine these arguments depend on the extension you decide to use and are outside of the scope of this documentation.
How to flash boards
To flash a build configuration onto one device, complete the following steps:
- Make sure your board is connected to your machine.
-
Click on the Flash option from the Actions View.
Tip
In some cases, for example when you want to erase UICR, you can use Erase and Flash to Board.
-
If you have multiple boards connected, pick a device to flash when a prompt appears at the top of the screen.
Once the flashing starts, a small notification banner appears in the bottom right corner of VS Code to display the progress and confirm when the flashing is complete.
How to flash boards after changing an application
If you make any modification to your application, use one of the following options to flash your board:
-
Depending on the type of changes:
- If you only changed some code in your application, use Build from the Actions View.
- If you have added or removed configuration files, use the Pristine Build option to the right of Build.
Both these actions will rebuild the configuration.
-
Click on Flash to flash to the board again.
How to flash multiple build configurations
To flash multiple build configurations in parallel, use one of the following methods:
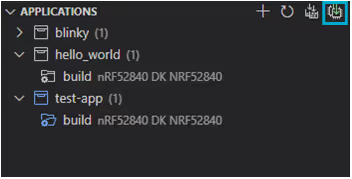
- Use the
nRF Connect: Flash All Linked Devicescommand. - Click the icon located in the Applications View Actions.
This will flash all linked build configurations. This feature is not available if a board is linked to more than one build configuration.

How to customize flashing actions
You can use the following customization options with the flashing action:
- Rename connected devices, so that you do not have to remember their serial numbers.
- Bind different tasks to the Flash action.